Last Updated on June 14, 2020 by Nathaniel Tower
Recording an audio version of something you’ve written can be a great way to help expand your audience. Aside from giving your readers another medium to “read” your work, it also adds a personal touch. You and your stories get more personality. I mean, have you ever listened to T.S. Eliot reading of “The Wasteland”? Just listen to the personality there!
Whether it’s your novel, a poem, or your latest short story idea, recording an audiobook is going to help you reach more people. Of course, the biggest obstacle to getting those audio stories out there is figuring out how to do it. Luckily, modern technology makes it pretty darn easy, even if you are technologically challenged. Here are some tips on how to record and publish audio versions of your novels, poems, or short stories.
Step 1: Get the Right Equipment
If you are going to record your stories, you might as well do it the right way. You don’t want your story to sound like a 1983 bootleg version of a Metallica concert recorded with a cassette recorder hidden in the pocket of someone in the mosh pit. Do things the right way. You really don’t need much: software and a mic. That’s pretty much it. My software recommendation is Audacity. You can record and edit like a pro with this free and easy-to-use program. This is the mic I recommend, but you can certainly start with something cheaper. Be sure to get something decent though. Add a simple pop filter to enhance the sound quality.
Equipment list for your audiobooks:
Step 2: Prepare Your Studio
You don’t actually need a studio in order to record your story. Any desk in a quiet area will do. I really do emphasize the need for a quiet area. Choose a room that doesn’t have a loud echo, and don’t put your microphone right next to a noisy computer fan. You want to limit background noise as much as possible while you are recording, so don’t pick a spot that tends to have a lot of interruptions. Once you have your area picked out, you are ready to record. Position the mic between 6-12 inches away from your mouth and get ready to read. Have your story available in an easy to read format that doesn’t require loud page turning or other noisy activities.
Step 3: Record
The first thing you want to do during the recording process is test your settings. Record just a few seconds of your reading. Don’t yell “test, test, test” over and over. Actually read a sentence or two in the voice you plan to use. Listen to this clip to make sure your volume is appropriate (and that you have actually set up your microphone correctly). Once you are satisfied with the clip, now you can dive right in.
When you read, be sure that you speak clearly and at a good pace. If you read too fast, your audio will be garbled. If you read too slow, your audience will fall asleep. You should also resist the temptation to overdo the vocals. For example, don’t actually scream when your characters are screaming. You can raise your voice a little, but your microphone probably can’t take your scream, unless you are a professional screamer. Then scream away.
I strongly recommend recording the whole story in one take. This will make editing much easier. While you might be able to read through your story with no mistakes, even the most seasoned voice actors/readers will screw up. Don’t stop the recording when you do mess up. Instead, pause for a few seconds and then start that particular section over. This will allow you to easily find where you made the mistake.
Step 4: Edit
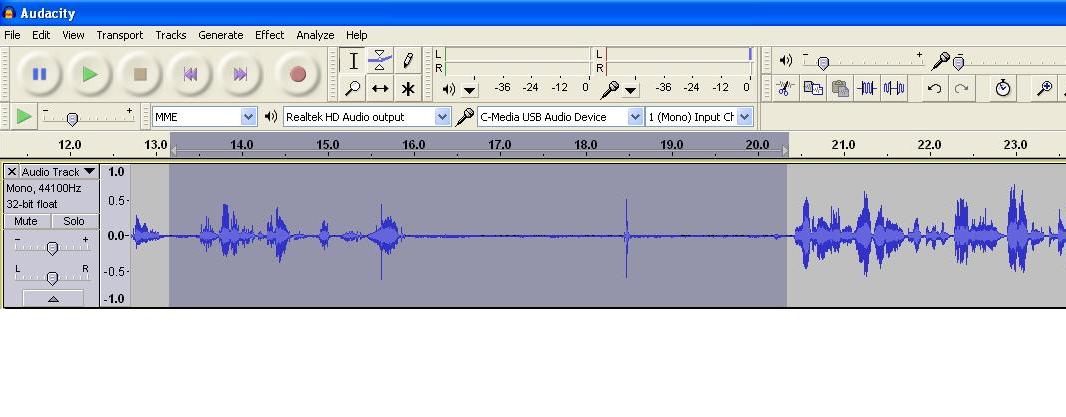
There are all kinds of editing features you can do with Audacity. You can increase sound levels, normalize the volume, add sound effects, etc. Since you are reading a story, you probably won’t do too much. Of course, you will want to clean up your mistakes. Luckily, you followed my advice from Step 3 so you can make your editing process a breeze. Now you just have to go back and find any mistake, select it, and delete it. It’s that simple. Since you paused for a few seconds, you’ll be able to find the mistake easily (just look for the flat line that indicates your pause):

After you delete your mistakes, perform any other edits you want, and then you are ready to publish.
Step 5: Publishing
When you go to “save” your file, you will need to select the Export option. Simply saving it will give you a file that can only be used by your sound editing software. You won’t actually be able to share that file for others to listen to your recording. I recommend exporting as a WAV in order to get the best quality. However, if there are size restrictions, you will want to choose something smaller like an mp3. You will probably need to download an extra encoder in order to do this.
In terms of publishing, there are a lot of different options. You can upload your audio to Soundcloud, to YouTube, to your blog, or you can send it directly to your publisher to post on the site alongside the story. You can also create your very own Podcasting series if you plan to do a lot of recordings.
Recording your short stories adds a brand new element to your work. It’s a fun experience for both you and your readers. If you’ve never recorded one of your stories before, then go do it now. Of course, keep in mind that you don’t sound like you think you do. No matter how great your voice is, it will always sound a bit weird to your own ears.


Assuming you make the recording available to the public, would this count as being “published” by most journals? Would that mean it can no longer be submitted elsewhere?
Paul, that’s a great question. I generally only record stories that have been published somewhere else. However, recording and publishing the audio of your story won’t necessarily mean that you can’t submit it. After all, most literary magazines are asking for first print/digital rights (as in text rights). This may not include audio rights. The best thing is to be upfront with a publisher and let them know that an audio version does exist. If you want to be safe, don’t record anything that isn’t published in text format first.