Last Updated on January 4, 2020 by Nathaniel Tower
Every website owner wants to get as much traffic as possible. One of the best ways to get traffic is by ranking well in organic search results. Easier said than done. There are hundreds of ranking factors, so no single thing you do is going to get you to number one on Google. However, anything you do should help in the long run.
About a month ago, I read an article detailing how one SEO guru increased his organic search traffic by almost 50% simply by removing the dates from his permalinks on WordPress. Since I had been using the dates in my permalinks at the time, I decided to follow in his footsteps to see if I could get similar results. I did. And now this post is going to talk about why you should do remove dates from your permalinks, how to do it, and what the results might ultimately be.
Let’s start with the why.
SEO-friendly URL structure
There are many small things you can do to improve your search engine rankings. One of those things is using SEO-friendly URL structure. That’s essentially what this post is all about. In short, an SEO-friendly URL structure requires these two things:
- Clean, concise URLs consisting of recognizable words separated by hyphens
- Use of keywords within your URLs
An example of the above is my page nathanieltower.com/published-short-stories. This URL is clean and concise. The search engines know exactly what it’s about: published short stories. It can’t get much easier than that.
You want to avoid the following in your URLs:
- Long, unreadable strings of numbers and other characters
- Using underscores
Doing either of the above can make your URLs difficult for search engines to read and comprehend. It can also reduce your click-through rates because people like to have some sense of what they are clicking on before they click. Imagine if I used this URL:
nathanieltower.com/published_storiesonmywebsitethatireallylikeand_wantyoutoread9345435234543253425342532453245
Would you be more likely to click on that or on the clean one? The answer is pretty obvious. And don’t worry. I did set up a redirect on that crazy, fake URL just in case you tried clicking it.

WordPress makes SEO-friendly URLs easy
If you have a WordPress website or blog, SEO-friendly URLs are built right into the platform through permalinks. But simply having WordPress doesn’t automatically give you this. You have to choose the right permalink structure in order to optimize your website’s search engine performance.
This post will walk you through what permalinks are, the best structure to use, how to change them, and the impact changing them can have on your website traffic.
To follow along, you’ll need the following tools:
- A website built in WordPress
- Google Analytics
- Google Search Console
- Redirection (plugin for WordPress)
- Yoast SEO (plugin for WordPress)
Note that Redirection and Yoast aren’t the only plugins you can use to accomplish this, but they are the plugins I recommend. They are easy to use and reliable plugins that are widely implemented across many WordPress sites.
What are permalinks?
Permalinks are pretty much exactly what they sound like. In WordPress, the permalinks are the permanent URLs of your posts. For example, the permalink of this particular blog post is:
nathanieltower.com/how-and-why-to-remove-dates-from-your-permalinks.
You’ll always be able to find this post by going to that URL. If you go to a different URL, you won’t access this post (unless I have a redirect put in place).
Each page on a website should have a permanent URL that doesn’t change so people can always find it via a link (and so your site doesn’t break). Choosing the right permalink structure is an essential part of your website’s performance.
What is the best permalink structure?
There are a number of default ways you can set up your permalinks in WordPress. Here are the out-of-the-box options you can try:

For usability and SEO purposes, you want your permalinks to be as clean as possible. Therefore, the best approach is to use the post name option. This will result in clean, SEO-friendly URLs that are memorable and won’t confuse readers or search engines. Honestly, I’m not sure why all those other options even exist. If someone wants to chime in, please share your thoughts in the comments below.
Can I change my permalinks?
If you are currently using a different permalink structure, such as month and date, then you can and should change your permalinks. As mentioned earlier in this post, simplifying your permalinks can have a big impact on the amount of organic search traffic you get to your blog.
However, it’s not as easy as checking the right option and clicking save. There are several things you need to do when changing permalinks in order to ensure your site continues to work optimally. As you’ll notice from the warning in the screenshot above, changing your permalinks is a big deal and not one you should take lightly. It is definitely worth it in the end though.
Here are the steps you must complete if you want to change your permalinks without hurting your SEO or your usability:
How to change your permalinks
The act of changing permalinks is very simple, but here are all the things you need to do to make sure it works properly. If you just change your permalinks without doing all of these things, you will have a lot of broken links on your site and you will lose a lot of your visibility in search results.
Important Note: Before doing any of this, make sure you set aside the proper amount of time to do it. It should only take an hour or two to properly execute everything, but you don’t want to be interrupted while you are doing it. This is a relatively simple but MAJOR change that will have a large negative impact if not done properly. If possible, you should do this on a test environment first and then push it live. The steps outlined below assume you are doing it on a live website, which is how I did it with no negative consequences.
Step 1: Prepare your 301 redirects
A 301 redirect is a method of sending one URL to a different URL. Whenever you permanently change a URL on your website, you want to be sure to put a 301 redirect into place. This will tell search engines like Google the page has moved. More importantly, it will automatically send the old URL to the new one. This is especially important if that page has been linked by other websites. Failing to add 301 redirects will ultimately result in lost authority and a bad user experience.
Here is how you should prepare your 301s if you are using WordPress:
- Install and activate the Redirection plugin if you don’t already have it.
- Create a spreadsheet with all your old URLs in one column and all the new URLs in the second column following these tips:
- Label Column 1 source url and Column 2 target url.
- Find all your post URLs easily by going to your XML sitemap, which is typically found at yoursite.com/post-sitemap.xml.
- Copy all of these URLs and place them in the first column of your spreadsheet
- Remove your domain so each cell only contains the URL path (example: /2018/10/16/how-to-write-a-great-author-bio/). You can do this easily with the find and replace function in Excel.
- If you don’t have an XML sitemap, install the Yoast SEO plugin and enable your XML sitemap.
- In the second column, enter all the new URLs, which should be exactly the same except with the date removed. For example: /how-to-write-a-great-author-bio/
- If you are using AMP on your WordPress site, you will also need to set up redirects for each AMP version of your URL. Duplicate all the URLs in each column and simply add amp/ to the end.
- Double and triple check your work to make sure you have all your old and new URLs entered correctly.
- Save your spreadsheet as a CSV.
Now that you have your redirects all ready to load, let’s move to the next step.
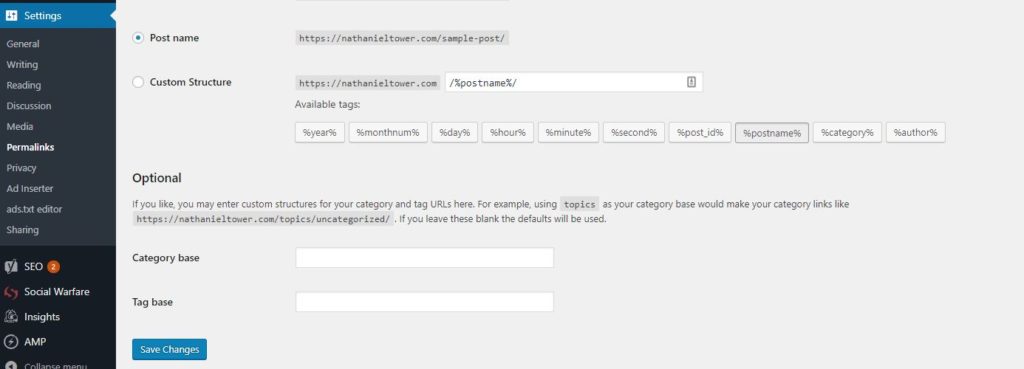
Step 2: Update your permalinks
This part is pretty easy. You just need to log into WordPress and go to Settings > Permalinks. But before you rush into doing this, let’s talk about timing. You’ll want to change your permalinks at a time when you generally have very low traffic on your site. By going to your real-time report in Google Analytics, you can find a time when very few people are actively on your site.
All you have to do for this step is select “Post Name” and then hit the “Save” button at the bottom. As soon as you have done this, all of your URLs have changed to your new, SEO-friendly format. For a brief moment, that means all of your old URLs will be broken. That’s why you need to move to the next step very quickly.
But let’s check one thing before we do that. We want to make sure your URLs actually updated to the new permalink structure. To do this quickly, I recommend you load your XML sitemap again. When you go to the post sitemap, you shouldn’t see any dates at the beginning of the URL path anymore. Simply click on any URL and it should load correctly. After all, you don’t want to set up all the redirects if you haven’t actually changed the URLs.
Once you’ve tested this, let’s quickly go to the next step.
Step 3: Load your 301 redirects immediately
As soon as you’ve changed your permalinks, you need to go to Tools > Redirection in your WordPress admin panel. Then go to the Import/Export option at the top.
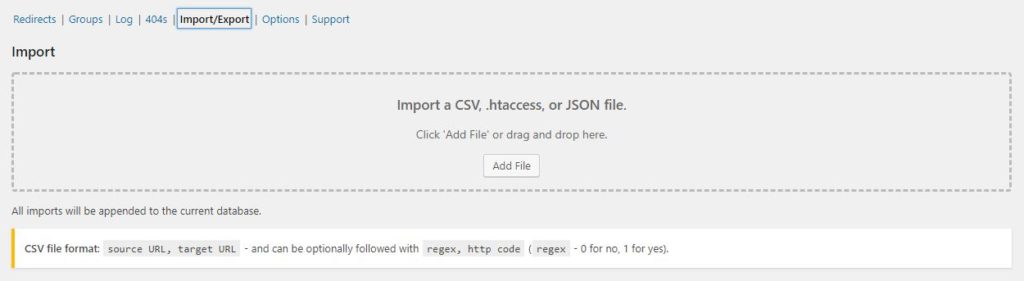
Next, just add your CSV. You can do that by dragging it into the box, or you can click the “Add File” option. Remember, time is of the essence here, so make sure that file is ready to go.
Before doing the above, I would strongly advise you to set your “Default query matching” to “Ignore and pass all query parameters.” This is a simple setting you can select on the “Options” tab. By doing this, you’ll ensure any link you’ve posted that has custom tracking code (such as Facebook posts) will still redirect to your new URLs.

If you don’t do this, you’ll end up with lots of 404s from other sources. For example, take a look at this link I shared on Facebook:
https://nathanieltower.com/2019/01/05/how-to-get-a-story-rejected/?fbclid=IwAR3tF7EKCWeCmc5yA35TaeS7DT3CQMverU7GYOdxboYB1LF8ecdFqidKoeo
If I don’t “ignore and pass all query parameters,” then my redirect won’t work for this link. As a result, anyone clicking on that link would end up on my 404 page. And you don’t want to try to use regex to do this because then it would strip out all your tracking code.
Now that you’ve loaded your redirects, your old URLs shouldn’t result in 404 errors anymore. But we better test to make sure.
Step 4: Test everything
Any time you make a change, you want to make sure you thoroughly test that it’s still working. If it’s functioning properly, you should be able to go to your old URL and end up on the correct post.
For example, if you copy and paste this URL into your browser:
https://nathanieltower.com/2018/10/16/how-to-write-a-great-author-bio/
You will end up here:
https://nathanieltower.com/how-to-write-a-great-author-bio/
If that doesn’t happen, then you need to check to make sure your redirects were properly imported. If anything goes wrong here, I would recommend you quickly change your permalinks back to the original setting and take a breather. This will give you a chance to review your 301 file and make sure it’s in order.
Assuming everything is working so far, you should also test your redirects by clicking on any known links you have on other websites or social media sites. For example, if you recently posted a link to one of your posts on Facebook, click on it to make sure it is still resulting in the correct page. If not, you have a problem.
I would also recommend going into Google Analytics, navigating to your top pages report, and then launching those pages to make sure they are going to the new URL. If they aren’t, you have a problem somewhere.
If all of the above is working fine, then it’s time to move to the next step where you can start the SEO magic.
Step 5: Tell Google
Google doesn’t know what you’ve done yet. You need to let Google know right away. Hopefully, you already have your site verified in
Google Search Console. If not, it’s very easy to do through the Yoast plugin by going to SEO > General > Webmaster Tools.
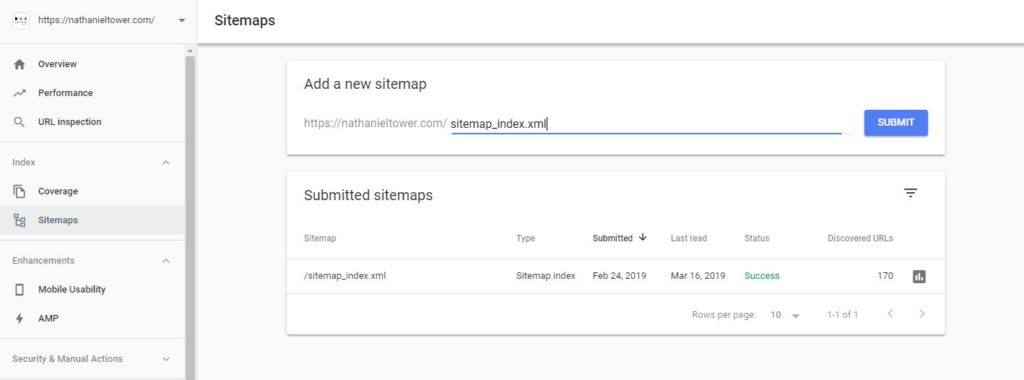
In Google Search Console, you’ll want to resubmit your sitemap. At this point, we already know your sitemap updated properly because you checked that in Step 2.
Submitting your sitemap in Google is super easy. Hopefully you’ve done this before, but it’s not a big deal for this exercise if you haven’t. Regardless, just navigate to Sitemaps in Google Search Console, type sitemap_index.xml (or whatever your sitemap URL path happens to be) and click “Submit.” Boom. You’ve just told Google you have a new sitemap.
Google will typically crawl your sitemap pretty quickly, but you want to do a few other things to initiate this change. You can use the URL Inspection tool to check on your new URLs. They will more than likely show up as not being indexed yet. I would recommend checking your top ten posts and submitting them to Google for indexing. Unfortunately, gone are the days when you could submit your entire site for reindexing in Google Search Console. But doing a few URLs will get the ball rolling.
Step 6: Change all your internal links
Okay, this step sucks and might take several hours depending on how big your site is and how often you’ve linked to other posts (which you should be doing a lot). Fortunately, this isn’t an urgent task that must be completed immediately.
None of your internal links should be broken since you set up all your 301 redirects, so this won’t have any immediate impact on your performance even if you never do it. However, every redirect puts a little stress on your server and site speed, so it is important to reduce internal redirects as much as possible. Therefore, you should go ahead and change those internal links.
To make this reasonable, I recommend updating one or two posts per day instead of doing them all at once. All you need to do is remove the date portion of the URLs.
Step 7: Make an annotation in Google Analytics
Whenever you make a major change to your website, you need to annotate this in Google Analytics. If you haven’t used annotations before, it’s very simple. Just go to Admin > View > Annotations and type up your note. Something as simple as “Updated permalinks to post name” will do the trick.
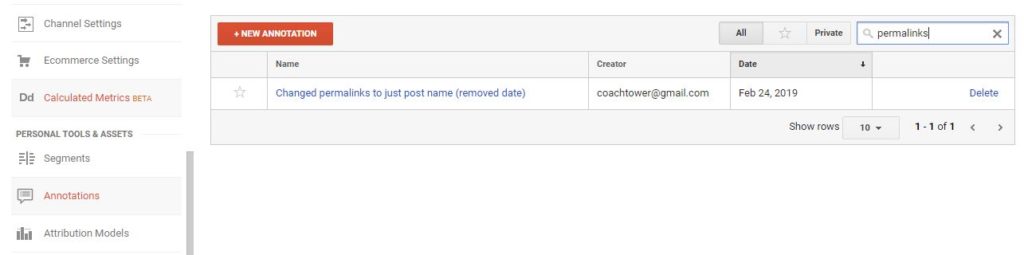
By making an annotation, you will be able to easily analyze and compare data from before and after your change. And you won’t have to try to remember when you made a change or what might have happened on a particular day that led to a big spike.
Wow, that was the easiest step so far, right? Let’s keep this going. You are doing great!
Step 8: Track your progress
You didn’t do all this work to not see results. You’ll want to track your progress carefully through a few different methods:
- Use Google Analytics to monitor your organic search traffic. You’ll want to track this over time and also use comparison reports. Hopefully, you’ll see your organic search traffic go up pretty quickly.
- Use Google Search Console to monitor your impressions, click-throughs, and average positions. You might see some negative fluctuation at first, but you should see big gains pretty quickly. Keep in mind that Search Console data generally lags a few days behind, so you can’t see immediate results here.
- Check the search results manually. Search for the keywords you know that trigger your posts. For me, I diligently checked “am i a good writer” and “short story format.”
- Monitor Google Search Console for any increase in 404s. If you see any issues that suggest your old URLs are causing 404 errors, then you need to make adjustments to your settings.
- Monitor the use of your redirects in the Redirection plugin. With Redirection, you can easily see how many times each redirect has been used by looking at the hits columns. If these numbers stay at zero, then it’s a good sign they either aren’t working or no one had linked to that content. As you can see from the screenshot below, my redirects have been accessed quite a few times:

If you see any declines in your organic traffic or rankings, then it’s possible you did something wrong or that Google isn’t processing your changes correctly. Look for the source of the issue, then adjust accordingly.
The results of changing your permalinks
Keep in mind that this is not an overnight change. You aren’t going to see a huge increase in traffic the next day or even the next week. It takes about a month to really see the good stuff.
Don’t be alarmed if you see an initial drop in traffic or positions. Remember, things fluctuate all the time. As long as you’ve done everything properly, you should be okay.
For me, I noticed one huge drop in average position and impressions during this process. It was about a week after I made the change. You can see what I’m talking about pretty clearly right here:
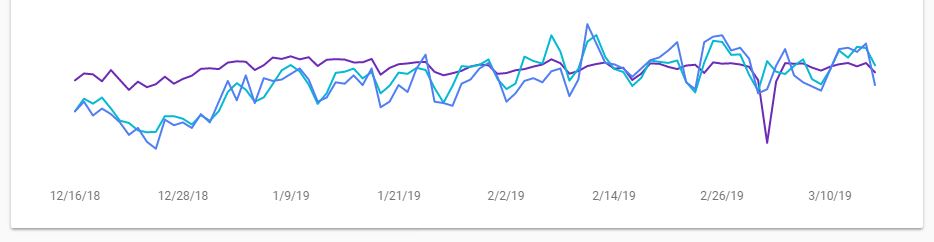
I didn’t panic. I just ran all my tests to make sure my redirects were working and that Google still had my URLs in the index. Everything was fine, and my pages recovered quickly.
After three weeks, I had seen about a 30% increase in organic search traffic. Pretty good so far, especially for just a couple hours of work.
I expect to see things continue to go up. I’ll keep updating this post with additional results to help you determine whether or not all this work is really worth your time.
Conclusion
The conclusion here is pretty straightforward: for best results, use “post name” as your permalinks option. I believe this works better for two primary reasons:
- The shorter, more concise URLs provide more meaning to the search engines.
- People are more likely to click on the shorter, more concise URLs that don’t contain the date. This is probably especially beneficial for older posts.
There you have it. Everything you need to know about why you shouldn’t use dates in your permalinks and how to make the switch. It’s relatively easy even if it sounds complicated.
Have any questions about updating your permalinks? Share your question and experiences in the comments. If you need any assistance implementing any of this, please contact me.
I have one question, please can you answer?
Basically my Niche site-https://www.easebedding.com/, which is over three years old and when I started, I just created permalinks without having any knowledge and site started to grow and I made with only this one site $28, 000 and even more in these three years.
I didn’t use any ads, all traffic was increased continuously for two years and then started to drop.
Still I was making money, but not like before. So I planned to change permalinks( because they were with month and year) and I did, put more content in each article, removed all broken links and gave new names to some articles.
From each article’s permalink, I put the new date like 2019 and updated it.
First 2 week traffic increased then dropped 70-80% and and of course earnings decreased a lot.
So long question with details, Is it normal and how much time can you think ir will take to recover Organic Traffic?
Thanks in advance.
Nathaniel,
Great post! You have convinced me that you have walk this path and I am sure, that this is the only way to retain my SEO traffic.
For reasons you can imagine, I am going to try this first on localhost. The thing is, how am I going to check that the redirects are working, since wordpress by itself redirects to the parent post after permalink changing?
And another thing is that apparently, I won’t be getting any actual traffic due to localhost restrictions.
I am sorry for my bad english. I would be obligated if you could share any thoughts on this. Anyways, it is the best post and definitely I am going to give it a shot!
Warmest regards,
Nikos Greece
Thank you so much for this post! I had been procrastinating on doing this for way too long because I was intimidated by the process before I came across this page. Your descriptions and step-by-step layout were so much more helpful than other sites. Thanks again!
After redirecting the website homepage is not functioning
What’s your website? Did you set up a redirect for the homepage? If so, remove the homepage redirect and see if it works again. You might have created an infinite loop.
As for the date, it’s fine to set the page update visible only. Remove the date if you are writing about things that don’t age. For example, a soup recipe, or how to paint windows, etc. Google knows perfectly well when a given entry appeared in its search engine.