Last Updated on February 18, 2023 by Nathaniel Tower
Many writers and bloggers make the mistake of thinking they are done with a blog post as soon as they’ve written the final word, given it a quick once-over, and hit the publish button.
While this can work for some bloggers who have a massive following, it certainly isn’t the best approach to maximizing the potential of each piece of content you create.
If you want to get a big audience to actually pay attention to what you are posting on your blog, then you need to follow these six steps every time you publish a blog post.
Note – This post assumes that you have done your research and you have edited/proofread the post. The steps listed below are the less-common steps in publishing a blog post that many writers often forget to do or don’t know they are supposed to do in the first place.
Write a strong title tag and meta description
You want people to click on that blog post in search results and when it’s shared on social, right? That’s where the title tag and meta description come into play.
The title tag is an HTML element that gives search engines and other crawlers more information about your page. It’s considered one of the most important factors for on-page search engine optimization (SEO). It provides search engines with more information about your content, and it’s also clickable headline that appears in search results (and often social media platforms) when your content gets an impression.
There is all kinds of debate out there about what makes a good title tag. Some of the things to consider:
Length – Google will only display 50-60 characters in search results, but a longer title tag might be beneficial. Although this may result in your title being truncated in search results, Google still reads the whole thing, and it’s essential for Google to understand what the page is about.
Keyword Placement – You need to have your target keyword or search phrase in the title tag, preferably at the beginning. If your post is about “how to become a better writer,” then try leading with that in the title tag (even if that’s not the exact name of the post).
Post Title – A lot of SEO experts have an opinion about whether the title tag and the post title should match. There is no real strong evidence that says they should or shouldn’t. Best practice says they should be directionally similar. In the example above, your title tag might be “How to Become a Better Writer – 9 Tips and Tricks” and your post title might be “9 Proven Tips for Becoming a Better Writer Today.”
Once you have the title tag perfected, make sure you add a meta description as well. Your meta description should be 155-160 characters, and it should contain your target keyword, tell what the post is about, and have a clear call to action. For example, you might write a meta description like this:
“Are you looking to become a better writer? Follow these 9 proven tips from expert writers to start improving today!”
That meta description will show up in search results and social platforms when your post is shared. You want people to click on it, so make sure it is clear and compelling.
Create a pinnable image
No matter what your blog post is about, images are hugely important in order to engage your audience and attract more attention. Even if you don’t have any images in the body of your blog post, you need to create a pinnable image that can be shared on Pinterest. This is also referred to as a “Pinterest pin.”
Even if you aren’t a big Pinterest user, this is an incredibly important step because it helps make your content more shareable. Posts that have pinnable images tend to drive ten times as much traffic as posts that don’t use any images at all.
When you make your pinnable image, you will want to do a few things:
- Use a clear and readable font
- Brand it with your URL or your website name
- Use a size around 1000 x 1500 (or a 2:3 ratio)
- Use bright colors that will stand out (but not obnoxious or clashing colors)
- Use a strong image that aligns with your topic
It’s typically best practice to create a few pinnable images, but having at least one will drive dramatic improvement in your results.
You can quickly and easily make a Pinterest pin by using Canva and one of the many free templates available in the tool. Here’s an example of a quick Pinterest pin you can make in less than five minutes:
Pin the post to multiple boards on Pinterest
After you publish your blog post, now you need to share it as many places as you can (without being annoying, of course). One of the greatest places to share your blog post is on Pinterest. After all, you created that great pinnable image in the step above, so now let’s make use of it.
When you share to Pinterest, ideally you will want to share that pin to multiple boards to increase the likelihood of getting the right eyes on it. For example, using the post above, you might pin your “How to Become a Better Writer” post to these boards:
- Writing Tips
- Writing Resources
- Best of [Your Name]
it’s also good to be a member of some group boards so you can share your post somewhere that multiple people are likely to see and reshare right away. Just make sure the group boards are active and have somewhat like-minded people who will share your content to relevant boards of their own.
If you aren’t a Pinterest user, I highly recommend you create a Pinterest profile and begin using it to build your audience. Almost half of my traffic comes from Pinterest today. It’s one of the fastest and most sustainable ways to build up the readership of your blog (which can also lead to a lot of affiliate income for you).
Submit the post for indexing in Google Search Console
Whether you are writing your post for a specific keyword or not, it’s important to get your content indexed in Google as soon as possible. After all, no one can find it in search results if it isn’t in the index at all.
If you leave it up to Google, it might be days or even weeks before the new post gets indexed. Fortunately, Google provides us with a tool called Google Search Console that we can use to help speed up the process.
To do this, you will need to make sure your website is verified in Google Search Console first. Verification is relatively easy and can be done in a variety of ways. Google will walk you through that process, so I’ll skip the explanation in this post.
Once you are verified, you will simply paste the URL for your new blog post in the “inspect” search bar at the top of Google Search Console. Google will take a few seconds to retrieve the page and then will share the current status of that page. If you just published it, it will most likely display this result:
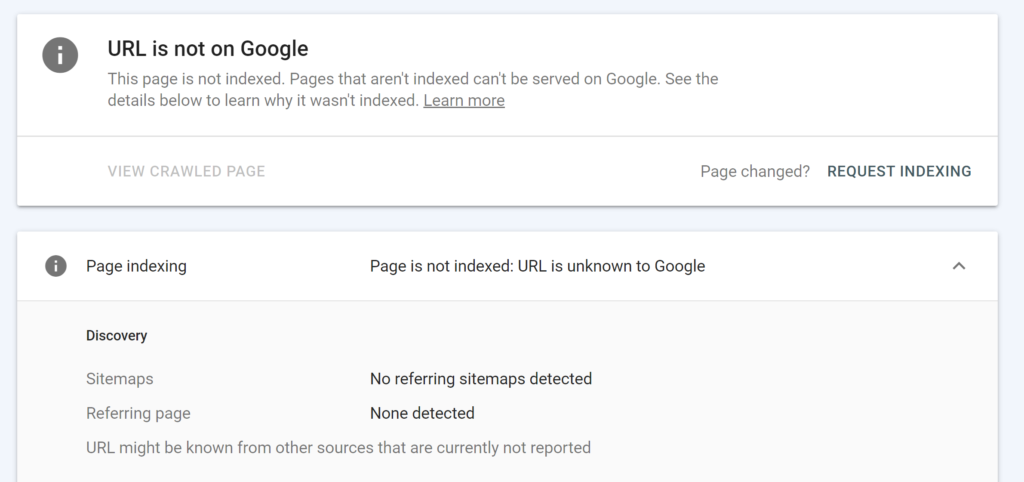
Since you just published the post, Google hasn’t had the chance to find it yet. Once Google does find it, it can choose to do one of three things:
- Ignore it
- Crawl it
- Crawl it and index it
We obviously want it to do option three.
The easiest and fastest way to get this process in motion is to click the “Request Indexing” button on the results page you got above.
Once you do this, Google will test to see if the post can be indexed, and then it will process the request. Once you submit, it can take between a few hours and a few days to have the page indexed. There are some instances where Google will choose not to index it. If this happens, you should go back to the post and make sure it’s a high-quality piece of content.
Also make sure your new post is in your XML sitemap, which should be done automatically if you are using WordPress and the Yoast SEO plugin.
Add internal links pointing to the blog post from 5-6 other pages on your site
It’s common practice to add links to your new blog post, but many bloggers skip an even more important step. You need to go back and add links from other pages on your website that point to the new blog post. When adding these internal links, you should be looking for other pages on your site that naturally lead to this post.
For example, if you are writing a post about how to beat writer’s block and you have another post on your website about tips to help you write every day, then it would make sense to add a link to your old post to point back to the new post.
The reason this is important is because it sends signals to search engines that you have this new content, and it also tells the search engines more about this content and why it’s valuable. This can help improve how quickly and how well the new content ranks in Google.
When you are creating those links, make sure you do it in a natural way that makes sense. Don’t jam unrelated content into an old blog post. Also, make sure you create clear and concise anchor text that points back to the new link. Avoid using really long anchor text or vague anchor text like “click here.”
Monitor Performance and Make Adjustments
One of the most frustrating things I see bloggers do is publish a new post and then move onto the next thing without ever considering that post again.
Presumably, you have a goal for each piece of content. It might be getting a certain number of pageviews, ranking for a certain keyword, getting so much engagement on social, generating a number of new subscribers, and so forth.
You need to monitor your performance on a regular basis to see if you are hitting those goals.
If your goal is to rank for a certain keyword, then use position tracking software such as SEMrush to monitor where it’s ranking (don’t just Google it yourself). Or you can use Google Search Console to see how many impressions and clicks you are getting on that page. If the performance isn’t up to par, then make adjustments to the content, headings, title, and linking structure.
Similarly, if the goal is to get social media engagement, then check to see how much engagement you are actually getting. If no one is clicking or sharing, then maybe you need to change up the post image and reshare it on all your channels.
Make sure you don’t just check in with your post once or twice. You spent your valuable time creating this piece of content. Now take the time to make sure it’s actually accomplishing what you wanted it to.
One other tool to consider for monitoring your blog post performance is Google Analytics 4.
Final Thoughts On Publishing Your Blog Post
We would all like to think that creating a great piece of content will drive people to our website in masses. Unfortunately, content is not a “build it and they will come” situation. If you don’t take the right action before and after posting that new blog, your content will most likely fail.
You need to make sure you do all the right things to get the right people to visit your website and read your content. If you follow these steps, you will get more users faster, and that will help grow your audience for the next post you write as well!
What else do you do after you publish a blog post? Share your tips in the comments, and don’t forget to share this post on all your favorite channels.